


Photoshop shortcuts are a great way to speed up your editing process when finalizing product images. But there are so many available, it’s impossible to remember them all—especially if photo editing isn’t a core function of your job.
That’s why we created a handy guide to all the Photoshop shortcuts you need to know to execute pixel perfect product photo edits—along with a downloadable cheat sheet to pin to your desktop or print out for reference.
A note on Mac vs. PC
Key command shortcuts are usually a little different between Mac and PC (Windows) as each system has a slightly different keyboard. For the most part, anytime you see CTRL for PC, you can substitute COMMAND on Mac, and anytime you see ALT for PC, you can substitute OPTION on Mac.
There’s one notable exception to this rule. On newer Mac laptops, if you want to access the Function keys, you need to first press the FN key. On Mac desktops and PCs, however, no FN key exists.
List of basic Photoshop key command shortcuts
Learning Photoshop shortcuts can save hours of valuable time. Here are some basic Photoshop keyboard shortcuts you can memorize to make your workflow quicker and easier.
- Adjust image size: CTRL + ALT + I (COMMAND + OPTION + I on a Mac)
- Burn tool: O
- Close all open documents: CTRL + ALT + W (COMMAND + OPTION + W)
- Close document: CTRL + W (COMMAND + W)
- Copy: CTRL + C (COMMAND + C)
- Create a new document: CTRL + N (COMMAND + N)
- Create a new layer: SHIFT + CTRL + N (SHIFT + COMMAND + N)
- Create a perfect square or circle selection with Marquee Tool: SHIFT + drag
- Create duplicate in new layer: ALT + drag
- Cut (saved in clipboard): CTRL + X (COMMAND + X)
- Cycle between Blending Brush Modes with Brush Tool selected: SHIFT + +
- Cycle between Blending Modes: SHIFT + +
- Decrease or increase brush size (with Brush Tool selected): [ (decrease); ] (increase)
- Deselect current selection: CTRL + D (COMMAND + D)
- Eraser Tool: SHIFT + E
- Export document: SHIFT + CTRL + ALT + W (SHIFT + COMMAND + OPTION + W)
- Healing Brush Tool: J
- Merge copy: SHIFT + CTRL + C (SHIFT + COMMAND + C)
- Move in line with Move Tool: SHIFT + drag
- Open an existing document: CTRL + O (COMMAND + O)
- Open Curves dialog box: CTRL + M (COMMAND + M)
- Open Levels dialog box: CTRL + L (COMMAND + L)
- Open Preferences: CTRL + K (COMMAND + K)
- Paste: CTRL + V (COMMAND + V)
- Paste in place: SHIFT + CTRL + V (SHIFT + COMMAND + V)
- Print document: CTRL + P (COMMAND + P)
- Save a copy as: CTRL + ALT + S (COMMAND + OPTION + S)
- Save as: SHIFT + CTRL + S (SHIFT + COMMAND + S)
- Save document: CTRL + S (COMMAND + S)
- Select all: CTRL + A (COMMAND + A)
- Show or hide actions panel: ALT + F9 (OPTION + F9 on Mac, FN + OPTION + F9 on Mac laptop)
- Toggle between Brush Tool, Pencil Tool, Mixer Brush Tool and Color Replacement Tool: SHIFT + B
- Toggle between Healing Brush Tool, Spot Healing Brush Tool, Patch Tool, Content-Aware Move Tool, and Red Eye Tool: SHIFT + J
- Toggle between Lasso Tools: SHIFT + L
- Undo: CTRL + Z (COMMAND + Z)
- Zoom in: CTRL + = (COMMAND + =)
- Zoom out: CTRL + - (COMMAND + -)

In addition to these basic shortcut key commands, there are additional task-specific shortcut keys each section below.

Get your Photoshop shortcut cheat sheet
Download5 Photoshop shortcuts to know when editing product photos
1. How to use clipping path keyboard shortcuts
We’ve previously discussed how to use the Magic Wand tool to remove a background from your product image using Select Subject. But if your background has similar focus or coloring as your foreground, the Magic Wand tool won't work.
In these cases, creating clipping paths is your best option to remove the background. We've also put together a tutorial to help you learn how to use the Pen Tool to edit product images and remove the background in Photoshop.

Quick clipping paths are achieved with both of your hands: one hand typing on the keyboard, the other drawing with the mouse or stylus. Your keyboard hand types in the shortcut key commands to toggle quickly between tools so that your other hand can continue to draw the path quickly.
Before you create the clipping path, set up your workspace. Make sure both your Pen tool and your Direct Selection tool are visible in the Toolbar.

You should be able to see both your Layers panel and your Paths panel.
Note: If these panels aren’t visible, you can make them visible by selecting them from the Window dropdown menu at the top of the Photoshop application window.

If you plan to use a clipping path to separate a product image from its background, there are a series of key command shortcuts you can use to make the process quicker and easier.
Keyboard shortcuts for clipping paths
- P: select Pen tool
- A: select Direct Selection tool (to adjust points created with the Pen tool)
- H: select Hand tool
- ALT + click (OPTION + click on Mac) on point: create corner at point as you draw with Pen tool
- CTRL + = (COMMAND + =): zoom in
- CTRL + - (COMMAND + -): zoom out
- SHIFT + CTRL + N (SHIFT + COMMAND + N): create a new Layer
- Q: toggle Quick Mask Mode
- SHIFT + click: toggle Layer Mask
- SHIFT + F5 (FN + SHIFT + F5): fill layer with color
- CTRL + = (COMMAND + =): zoom in
- CTRL + - (COMMAND + -): zoom out
- SHIFT + CTRL + N (SHIFT + COMMAND + N): create a new layer
- F7 (FN + F7): hide/show Layers panel
Panel shortcuts
There are also some useful keyboard shortcuts within the Layers and Paths panels that will shave whole minutes off of your editing time.


How to use the stroke path Photoshop shortcut
When you apply the stroke path shortcut, your path will be outlined using the same width, hardness, opacity, blending mode, and color of your brush. Therefore, before you can use the stroke path Photoshop shortcut shown in the Paths panel above, you need to set up your Brush tool presets to the size and color you want. Because the path stroke will appear in your selected layer, it’s always a good idea to create a new layer and select it before applying the stroke path shortcut.
2. How to use a shortcut for clipping mask
On the surface, clipping paths and clipping masks appear to have a lot in common. However, there are subtle differences that become apparent when you use a clipping mask short cut.
The most common shortcut you can use to make a clipping mask is the small Add Layer Mask icon located at the bottom of the Layers panel and the Paths panel.

To quickly and effectively create a layer mask, first select the area of your layer you want to remain visible after applying the mask. Then click the Add Layer Mask icon within either the Layers panel or the Paths panel. You’ll instantly have the other parts of your layer “masked” out, leaving only your selection visible.

Another shortcut for clipping masks works with adjustment layers. For instance, the image below has two layers and an adjustment layer on top. The layer closest to the adjustment layer is transparent for most of the layer.

If you want to apply the adjustment layer only to the non-transparent areas of the top layer (in this example, apply the Color Balance to just the earbuds and not to the background), select the Adjustment Layer and type ALT + CTRL + G (OPTION + COMMAND + G on a Mac).

3. How to do a Photoshop crop shortcut
It's important that your images have a consistent aesthetic across your site. You can set up your Crop tool to quickly crop similar product images so they'll all be the same size and resolution.
How to create a crop preset for product images
When the Crop tool is visible in your Toolbar, type C to access it quickly.

Once the Crop tool is selected, you'll have access to a series of options at the top of the Photoshop window.
In the first dropdown in the Options bar, choose W x H x Resolution.

Set your width and height to the final dimensions you want your product photos to be.
For websites and apps, you'll want your width and height to be in pixels, and your resolution at 72ppi for standard web graphics. If you need your images to appear properly on a retina display, double both the height and width dimensions (so, a 400px x 400px image would now be set at 800px x 800px).
You can also click on the dropdown next to the grid icon to choose which guidelines you want to use to position your product image as you crop it. By default, this is set to Rule of Thirds.

Once you have your dimensions set, select the W x H x Resolution dropdown again and choose New Crop Preset. Give your preset a name that will help you remember what product images these crop settings will be applied to, such as "product thumbnail."
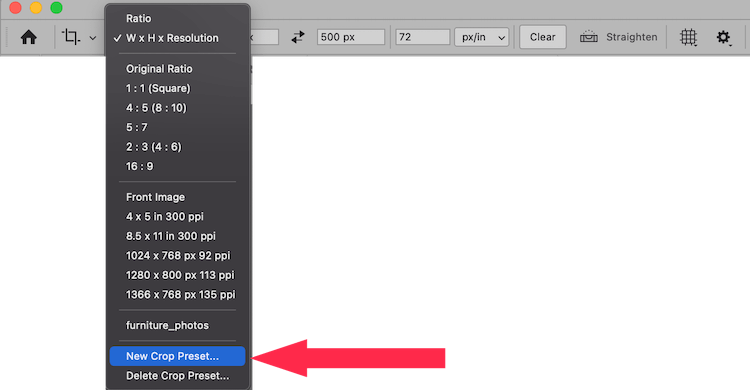
With your crop preset created, you can click on any product image with the crop tool, select your custom preset from the W x H x Resolution dropdown, and use the guides to position the subject of your photo in a similar fashion across all images.

The Crop tool also offers you some other useful tricks to ensure consistency. Click on the Straighten icon and draw a line along the edge of your product photo to straighten your image. Or hover your cursor over the corners of the crop edge to rotate the crop.

Once you're satisfied with your crop, click the check mark in the Options bar. Then repeat with the next image in your product series.

4. How to quickly export images for your website
Like the Crop tool, a little bit of setup with your export functions can save hours of time in your workflow.
If you know you'll be working on a large batch of web-ready photos that need to have the same file format, you can set up your Quick Export settings and then rapidly export each file into a web-ready format.
To set up your Quick Export settings, go to File > Export > Export Preferences…

In the dialog box that appears, you can choose what file format you want your image to export to (JPG, PNG, GIF, or SVG), the location where you want the exported file to live, and what color space you want the exported file to be in. If you've created a metadata template with copyright information, you can choose to have that applied to exported files here as well.

Once you've set up your preferences, click OK.
Quick Export also has its own shortcut key command. To Quick Export once you have the settings you want, type SHIFT + CTRL + , (SHIFT + COMMAND + , on a Mac).
The next time you need to export your image for your site, all you need to do is type this key command—the image will automatically export with all of your Quick Export settings.
5. How to easily create a true white background
If you've shot your product against a white backdrop and don't need to remove it from the background, chances are you still need to do some editing to make sure the white background in one image has the same brightness as the background in the next. This eyedropper shortcut will help you do just that in a matter of seconds.
With your product image open in Photoshop, choose Image > Adjustments > Curves… from the dropdown menu at the top of the application window. You can also bring up Curves by typing CTRL + M (COMMAND + M on a Mac).

In the Curves dialog box that appears, you'll see three eyedropper tools at the bottom of the window. Choose the eyedropper on the far right. This is the Set White Point eyedropper.
With the eyedropper tool selected, click on the background of the product image. Choose the darkest part of your white background that is not a shadow. The eyedropper will make those pixels 100% white, and will adjust the rest of the image accordingly.

Click OK.
You can repeat the process with the rest of your product photos. If all your photos were shot using the same lighting, you'll retain the consistency throughout while brightening the background.
Not happy with the shadows in your shot? You can learn how to add a natural shadow in Photoshop to fix them in post-processing.
How to create your own Photoshop shortcuts
If Photoshop doesn’t have a shortcut for something you do often, you can create your own shortcut key. To create a keyboard shortcut, go to Edit > Keyboard Shortcuts…

For this example, let’s create a shortcut to open the Shadows/Highlights… Dialog Box.
In the dialog window that appears, choose Application Menus next to Shortcuts For: since this is an option that can be accessed from the Application Menu. Because Shadows/Highlights… exists under the Image menu, click on Image in the scrolling menu at the center of the window, and then scroll down until you see Shadows/Highlights… under Adjustments.
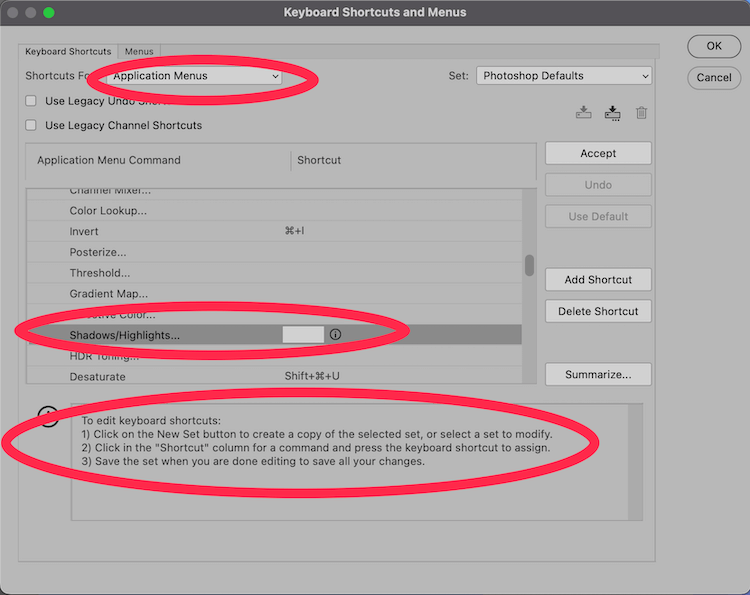
You can create any shortcut key you’d like as long as it’s not being used elsewhere by Photoshop and it contains either CTRL (COMMAND on a Mac) or a Function (F1, F2, etc.) key.
Because Photoshop has so many shortcut keys already, this may take some trial and error to find one that is not already in use. In this example, I’ve successfully entered COMMAND + SHIFT + 0 as an acceptable key command.
Once you’ve decided on a key command, click Accept, and then OK in the dialog box.
Get your Photoshop shortcut cheat sheet
DownloadPhotoshop shortcuts FAQs
What is the shortcut key for?
A shortcut key is for completing frequent actions more quickly with a keyboard command. It helps you edit photos more effichiently.
What is the shortcut of clipping mask in Adobe Photoshop?
The shortcut of clipping mask in Photoshop is to click on the Create Layer Mask icon in the Layers panel or the Create Mask from Path icon in the Paths panel.
What is the shortcut key to mask?
The shortcut key to mask is ALT + CTRL + G (OPTION + COMMAND + G on a Mac). First select the Adjustment Layer and type and then this shortcut will allow you to apply the transparency mask of a Layer to an Adjustment Layer.
What are the shortcut keys in Photoshop?
The shortcut keys in Photoshop are listed in this post and in this downloadable cheat sheet pdf. Memorize the ones that work best with the tasks you do on a daily basis. For a list of some of the most common shortcut keys in Photoshop, see the list at the beginning of this post.
What is CTRL + J in Photoshop?
CTRL + J (COMMAND + J on Mac) duplicates the layer you currently have selected.
What is CTRL + F in Photoshop?
CTRL + F (COMMAND + F on Mac) opens a dialog box allowing you to search for tools, tricks, tips, and other sources of helpful information from Photoshop. You can use this dialog box to select tools or search for commands, as well as browse tips and tutorials.

Let us look after your image edits, so you can get back to the fun stuff. Try Path free.
Learn more


![How to Create a Clipping Path in Photoshop [Updated for 2022]](http://pathedits.com/cdn/shop/articles/image14.jpg?v=1639448433 "How to Create a Clipping Path in Photoshop [Updated for 2022]")


