When you’re a freelance photographer, you’re used to creating beautiful images for your clients. But you know your work doesn’t stop after you press the shutter button. These days, clients expect perfectly polished, fully edited images.
For some photographers, photo editing is part of the job. For others, it’s an unnecessary, tedious task they don’t really want to do.
If you enjoy editing photos, guess what? You can turn that into an upsell. When you set up your photo editing services properly, you might not even need to shoot anymore — you just might trade in your camera to make a living as a photo editor.
That’s right: You could theoretically earn a decent income from home while dressed in your pajamas!
If this sounds good to you, you’re probably wondering how to charge for photo editing. And what photo editing rates to set.
Below, we’ll talk about hourly vs. per image vs. flat fee rates, how to determine which number to throw out, and what to make sure you’re including in those rates — and how you can make more money by outsourcing some of the work.
How much to charge to edit photos?
First, let’s define “editing.” There are many ways to edit a photo, and each of them require a different amount of time, skill, and knowledge.
- Simple photo editing: There’s simple editing, which includes basic changes like color correction or straightening of horizons.
- Photo retouching: Then there’s retouching, which includes more detail like removing glare from glass or extending the background of the image.
- Special photo editing: And finally, there’s special editing. This can include things like changing the color of an item, smoothing out wrinkles, or swapping out the background entirely. This level of retouching can take anywhere from ten minutes to hours — per image!
For the sake of clarity in this article, let’s assume we’re talking about the midpoint — more than just exposure and cropping adjustments, but not full beauty retouching. Also, we’ll assume that you’re pricing editing only, not the session or the use of the images themselves. (That’s a whole different set of considerations. If you want to read more about how to price those things, check out our article here.)

Different methods to calculate your rates
When it comes to pricing your editing, there are a few different ways to set your rates. Some photographers or editors use complicated calculations , but for the most part, setting editing rates usually boils down to three different methods: by the hour, by the project, and by the image. Each method has its pros and cons.
Setting photo editing rates by the hour
Setting your rates by the hour is the easiest way to price your editing, but that doesn’t necessarily make it the best. Sure, you’ll have a good idea of what you need to make and how long you need to work in order to be profitable, but chances are that your idea of how long an edit should take and your client’s idea of how long that same task takes are very different.
When you get to the end of the first hour and find that you’ve only completed eight images, you may have to go back to the client and reset their expectations on how much the entire job will cost them. That’s never a fun conversation to have.
On the other hand, you might fly through editing the entire session and not have any way to immediately make up the revenue you’ve lost by being too good at your job. You shouldn’t be punished for efficiency, should you? Because of these challenges, setting your editing rates by the hour typically only works when you’ve got a set of similar images, a clean workflow, and a really good idea of how long each image will take you.
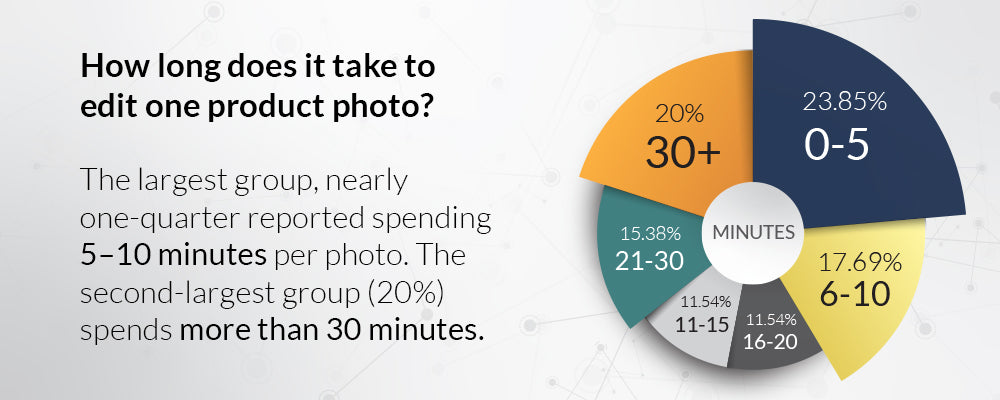
Just how long does it take to edit a product photo? For 25% of editors, it’s anywhere from 5 to 10 minutes per shot — while 20% spend more than a half hour.

Setting photo editing rates by project
Next, there’s the by-the-project method. This is an easy method to sell because clients know what to expect up front. No matter how long it takes, you will give them X amount of images for Y amount of dollars.
Sometimes, this works well for both parties. Other times, though, you could end up spending way more time than previously estimated just trying to get the images to look right.
Just like with the by-the-hour method, this method works best if you can accurately predict how long the work will take to complete. If you’re just starting out and don’t really know how long it takes you to complete an edit, time yourself as you go through a few sessions and get a baseline from that so you can be sure you know what you’re getting yourself into.
Setting photo editing rates by image
Finally, there’s the by-the-image method. This method is incredibly straightforward — if you ask for $1/photo, then $10 will get the client ten photos. This can be beneficial to everyone involved as it’s a clear cut way to charge. It also makes it easy for your client to plan budgets — and for you to forecast income.
On the flip side, it can get confusing, especially if you’re offering different levels of editing. This can also be frustrating for you, the editor, if you don’t have a minimum order requirement — there will always be clients out there who think they can hire you one image at a time. Because you’ll spend time communicating with them as well as editing their single image, you stand to lose a lot of time and money this way.
If you decide to go the by-the-image method, consider packaging your service by set intervals — you can give a price for 20, 40, and 60 images, for example. Your clients will still easily understand the pricing, and you won’t waste time editing just one or two images.
Whatever method you choose, know that your pricing can and should be commensurate with your experience. After all, it makes sense that a senior editor with talent and a proven track record should make more than someone who’s new to the scene.
What to include in your rates
When it comes time to calculate your rates, there are a few factors to keep in mind. You’ll also want to make all of these considerations clear to future clients to avoid any frustration or disappointment.
First, decide what type or types of editing you’ll offer. If you’re interested in performing light edits only, develop a list of what that includes. If you’ve decided that full specialty retouching is more your preference, create a list that describes what that includes. If you’ll be offering a variety of editing services, you’ll want to break them out into separate packages and price each one on their own so you can make sure each service is priced for profit.
Next, decide how many rounds of editing you’ll permit per image. If they’re not happy with the first set of photos, how many times will you allow them to request changes? It’s best to over communicate this stipulation — with some customers, it’s all too easy to get sucked into an endless pit of revisions.
Also consider your turnaround time. Give yourself enough time to do the job adequately. If you’ll be expected to return images within a short time frame, you can always add a rush fee.
How to charge for photo editing
Now that you have all of these considerations in mind, it’s time to put some numbers on paper. Start by calculating the time it takes you to edit one image. Then calculate the amount of time it takes to edit a typical image set. If you’ve decided to offer a few levels of editing, go through this exercise for each one.
Once you know about how long it takes you to edit images, decide how much time you have to dedicate to photo editing, and how much revenue you need to make overall. When you know these figures, you can divide the number you need to make by the amount of time it takes to do a session.
Let’s make math simple, and say you need to make $1,000 per week, you want to stay part-time so you can work ten hours each week, and each session takes you about one hour.
$1000 / 10 image sets = $100 per image set
Pretty simple, right? Complete that math for your own set of circumstances.
At this point, you probably have a basic number in mind, so it’s time to shop around. Look for other editing providers in your niche — not to copy their pricing structure, but to see if your rates are competitive and reasonable. Most basic photo editing is a pretty straightforward task, so you’ll have to stay at least somewhat competitive with your marketplace.
When checking out your competitors, remember that different companies serve different niches. A bespoke wedding editor who fully retouches each image will likely charge more than a product photography editor who focuses on quick, global edits.
If your numbers are in line with everyone else, great! Get out there and start marketing your business.
If you find they’re much higher, however, you’ve got to find a way to work more hours and drop the cost per image set, or you’ve got to find a way to be more efficient with your time.
One way to do this is to outsource a portion (or all) of the editing to a reputable company. While this costs money, some basic edits are affordable enough that you can make up for it with the saved time. This frees you up to do the finishing touches on your own and then send the image set back to your client. At Path, for example, clipping paths start at just 49¢ per image. With this option, you can price your editing services much more competitively.
You might wonder how to factor this into your cost of doing business, but again, the calculations can be simple. We’ve broken them down for you here.
With all this information in hand, you’re ready to calculate a price for your photo editing services. If you decide you need a helping hand so you can stay competitive and get more done in less time, get a quote for Path.


