

Scenery and context can bring products to life and add interesting details to your website's look and feel. But sometimes even the best images need people, objects, text, or other products removed before they'll work appropriately with your brand's visual aesthetic.
In the following Photoshop tutorial, we'll show you how to remove unwanted objects from your images quickly.
Editor's note: This tutorial will work for users working in Photoshop CC 2019, Photoshop Elements 2019, or GIMP.
How to remove unwanted elements using Photoshop CC 2019
Photoshop offers the most control when removing unwanted elements, so we'll start there. We'll cover the following:
- How to remove a person or object from a photo using Content Aware Fill
- How to remove a watermark or blemish in Photoshop using the CLone Stamp tool, Healing Brush tool, and Curves
How to remove a person or object from a photo using Content Aware Fill
The quickest way to make unwanted items vanish from your image is to use a Content Aware Fill. This method works great if your unwanted object is surrounded on all sides by the same color.
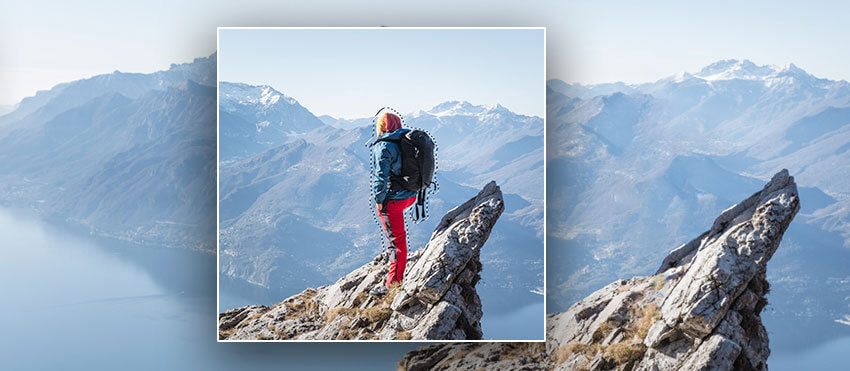
Step 1: Using your Lasso tool of choice, draw a rough selection around the object you want removed. Remember to include areas of the background you want preserved in the selection.

Step 2: Choose Edit > Fill... or type Shift+F5 (FN+SHIFT+F5 on a Mac laptop) to bring up the Fill dialog box.
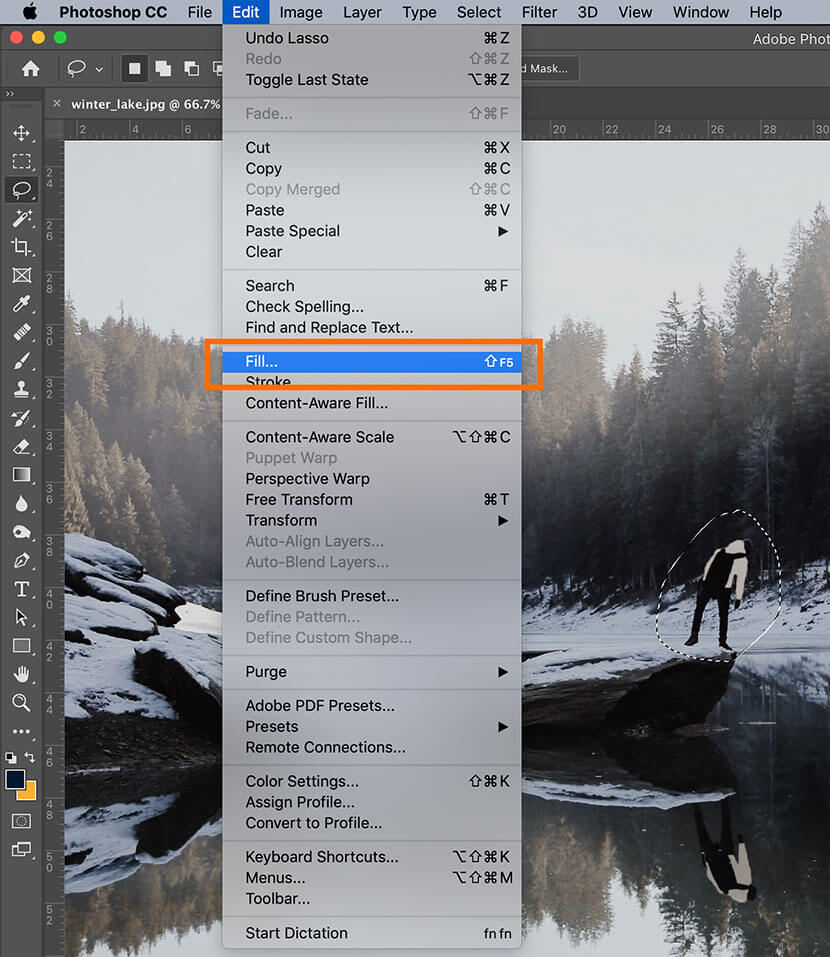
Step 3: In the Fill dialog box, choose Content-Aware, and make sure Color Adaptation is checked. You'll want to set the Blend Mode to normal and the Fill to 100%. Click OK.

Your unwanted element will vanish when you click OK.

In this photo, we need to repeat Steps 1–3 for the person's reflection in the lake as well. After the reflection has been removed, there are a few leftover pixels that still need to be cleaned up to completely create the illusion that the person was never in the photo.
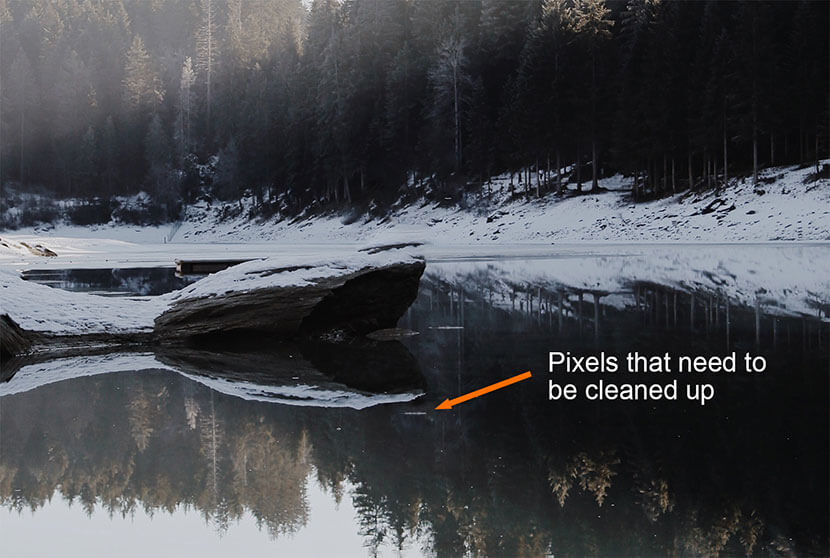
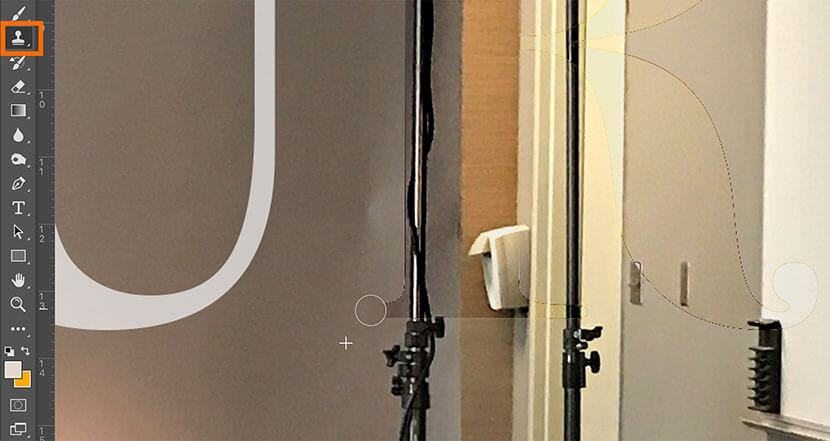
Step 4: Use the Clone Stamp tool or Healing Brush tool to smooth out any blemishes left over by the Fill, such as the pixels in the lake in the example photo.
The Clone Stamp tool and Healing Brush tool work almost the same way. With each of these tools, you sample pixels by clicking and typing ALT (OPTION on a Mac), and then painting with the tool over the area of the image that you wish to "fix" with your cursor.
The Clone Stamp tool repeats the sample pixels into the new portion of your image. The Healing Brush tool blends the sampled pixels with the colors already in that area, creating a smooth, seamless effect.

For this photo, I'll use the Clone Stamp tool because I want the dark colors of the lake to be uniform throughout the reflection, and not blended with the white areas I am covering up.

How to remove a watermark or blemish in Photoshop using the Clone Stamp tool, Healing Brush tool, and Curves
If your background is too complex to use the Content-Aware Fill method, you can use a combination of the Clone Stamp tool and Healing Brush tool to vanish unwanted elements. When removing a translucent blemish or watermark, you can also use the Curves dialog box to eliminate the unwanted element in pieces.
You should only remove a watermark if you have rights to the image you're working with. For instance, you could use this method if you've lost or deleted your original un-watermarked file, or if you're trying to remove a large blemish from a scanned photo. This method should not be used to remove a watermark from a copyrighted image owned by someone else.
In this image, the background is very complex, but it shows through the semi-transparent text that's been set on top of it. For the area under the "R" in "OUR," the background is too complex to repair using the Clone Stamp tool alone.

Step 1: Using the Magic Wand tool set to a tolerance of around 10, select the portions of the watermark overlaying complex imagery. Hold down SHIFT as you click with the tool to be able to select multiple areas at once. Depending on the watermark, you may need to do one part of the watermark at a time. In the example image, just the "R" is selected to start.

Step 2: Open the Curves dialog box by selecting Image > Adjustments > Curves from the drop-down menu or typing CTRL+M (COMMAND+M on a Mac).
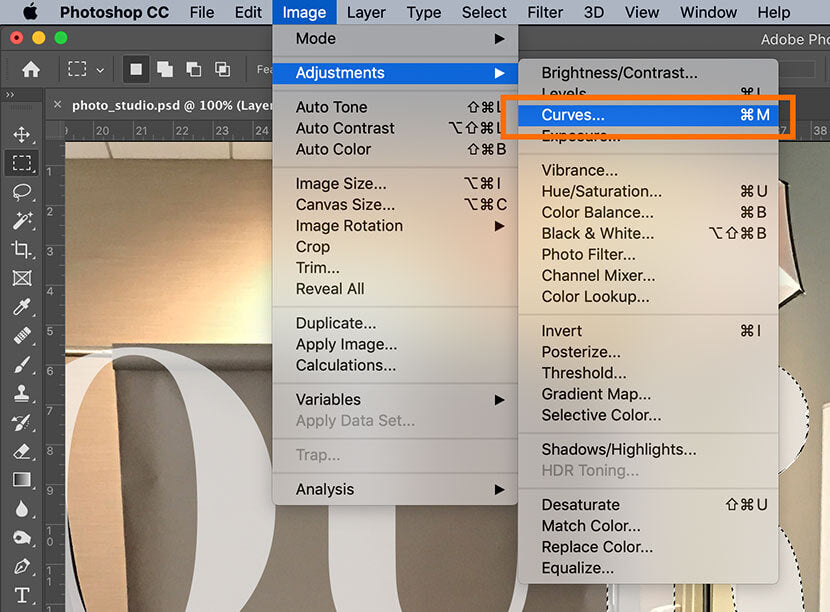
Step 3: In the Curves dialog box, click and drag down the middle of the curve line in the graph until the watermarked area roughly resembles the same contrast and color as the surrounding colors.
Note: For CMYK images, drag up on the curve instead of down.

Click OK.
Step 4: Use either the Healing Brush tool or the Clone Stamp tool to soften any edges resulting from the contrast adjustment.
Repeat the above steps with any other portions of the watermark.

Remove an unwanted element using Photomerge Scene Cleaner in Photoshop Elements 2019
If you're using Photoshop Elements instead of Photoshop CC, you can use the Photomerge Scene Cleaner to eliminate unwanted elements with just a few clicks of the mouse. This method takes portions of one image and merges them over your unwanted elements in another image.
Photomerge Scene Cleaner works best when you have two photos that are nearly identical, but each has elements within it that makes it imperfect. Using Scene Cleaner allows you to take the best of both images to create a better, final image.
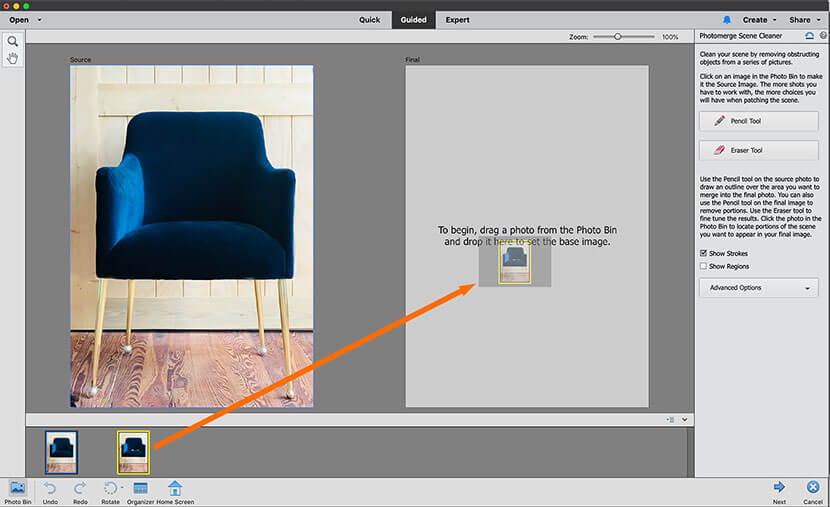
In the following example, we'll be using 2 images of a chair. The first image is a little out of focus and the second image has a cable draped across the chair. We'll use Photomerge Scene Cleaner to remove the cable.
Step 1: Open at least 2 images in Photoshop Elements Editor. With Photoshop Elements open, go to File > Open and select the files you wish to merge together.

Step 2: Click on the Guided tab at the top of the screen to go into the Guided room. From here, click on Photomerge (at the far right) and choose Photomerge Scene Cleaner from the options listed.

You'll now be in the Photomerge space. you'll see an area for your Source image (this is what you'll be taking pixels from) and Final image (this is the image you're cleaning up).
Step 3: Click on the image that you want to use as your Source image. It will appear in the Source space.
Drag the image you're trying to clean up into the Final window.
Step 4: Align your images, if necessary. Photoshop Elements attempts to line up your images, but if the alignment isn't perfect, you can manually line the photos up along three points.
Click on Advanced Options on the right, and choose Alignment Tool.
In your Source image, you'll see markers that correlate to markers in the Final window. Using your best guess, move the markers in the Final window to correlate to elements in the same place in your Source image.
For instance, in this example, the 1 marker is moved such that it is where the arm meets the back of the chair in both the Source and Final photos.

Once you have the alignment points in correlating areas of your photos, click Align Photos.
Step 5: Use the pencil tool to draw around elements you want to remove in the Final image. The Scene Cleaner will take the area from the Source image that aligns with the Final image and will place it in the same place.
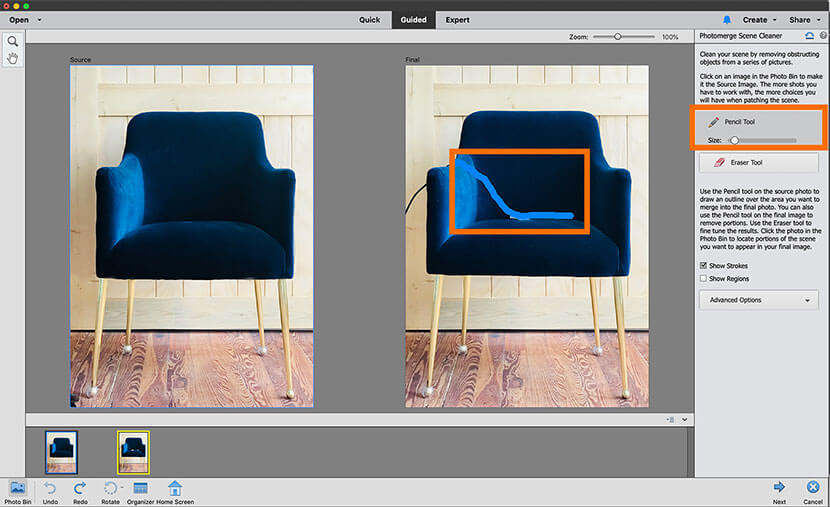
If you only want to remove an element from the Final image, you're done at this stage. If, however, you want to take an element from the Source and place it into the final, you can do that too.
In this image, let's add the background behind the left two chair legs from the Source and place it in the Final image.
Choose the Pencil tool from the far right and adjust its size with the Pencil slider. Then, paint over the element in the Source image. The area will appear in the Final image.
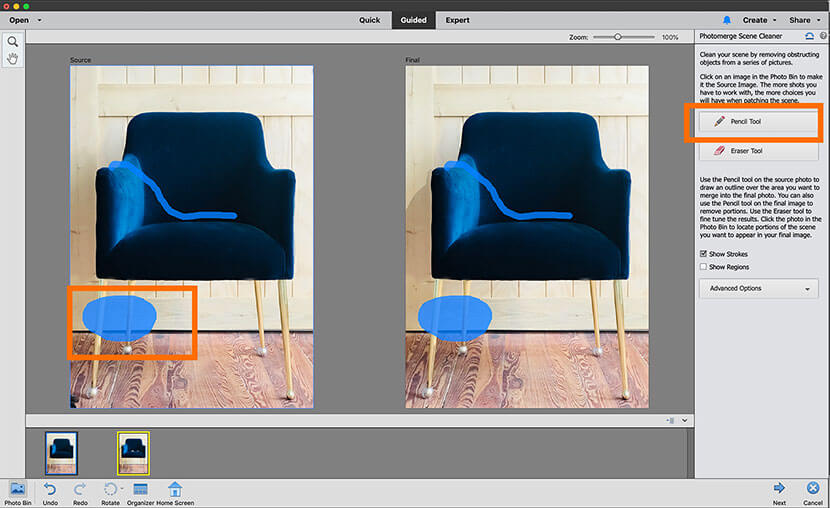
If you select too much of the Source image, you can choose the Eraser tool, just below the Pencil, and adjust its size using the slider. Then, erase unwanted portions of the Source image.

Step 6: Click Next in the lower right-hand portion of the screen.
Step 7: If you're satisfied with the end result, save your file.
How to use GIMP to remove an object from a scene
If you don't have Photoshop CC or Photoshop Elements, you can still edit your photos using the free open source software GIMP.
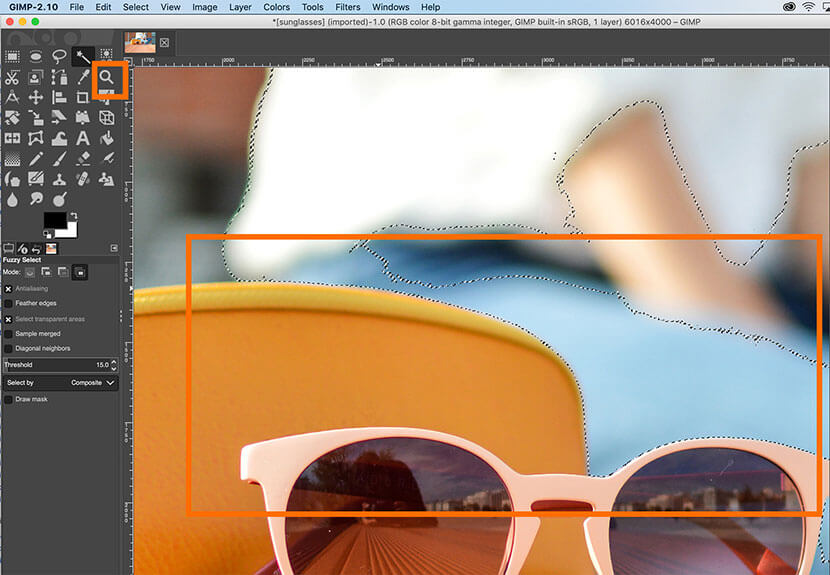
Step 1: With your image open in GIMP, grab the Fuzzy Select tool from the upper left-hand side of the application window and click on an area within the element you wish to remove from the image.

Step 2: Continue clicking with the Fuzzy Select tool to select the entire unwanted element. Use the Zoom tool (shaped like a magnifier glass) to monitor your selection — you want the selection edge to be as clean as possible around any foreground objects in your image.
Step 3: Once you have most of the object selected, including all edges of the selection, choose Select > Remove Holes from the dropdown menu at the top of the screen.
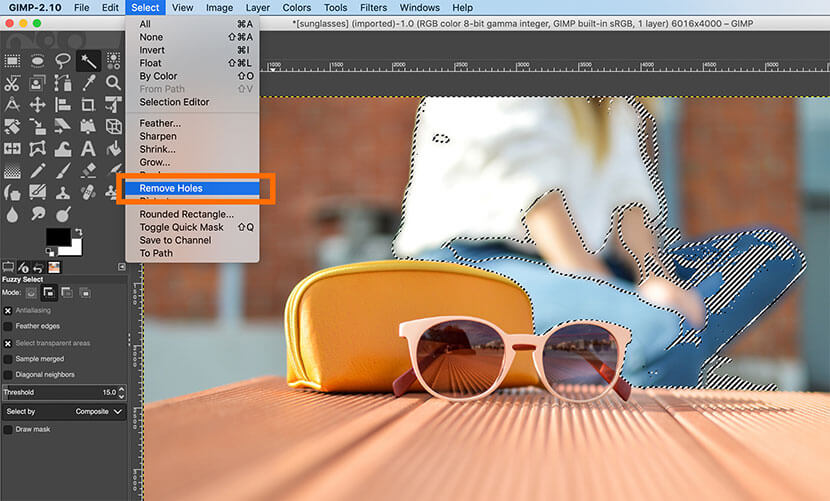
You should now have a clean selection.

Step 4: Use the Clone tool to paint over the unwanted object. Like in Photoshop, GIMP's Clone tool will sample pixels from one part of the image and "paint" over pixels in another part of the image. If you do this while your unwanted element is selected, you can ensure you'll only paint over the unwanted element and won't accidentally remove any portions of your desired composition.
To use the Clone tool, select it from the tools on the left-hand side of the screen. Then create a sample of pixels from the background you want to keep by clicking while holding down CTRL (COMMAND on a Mac).
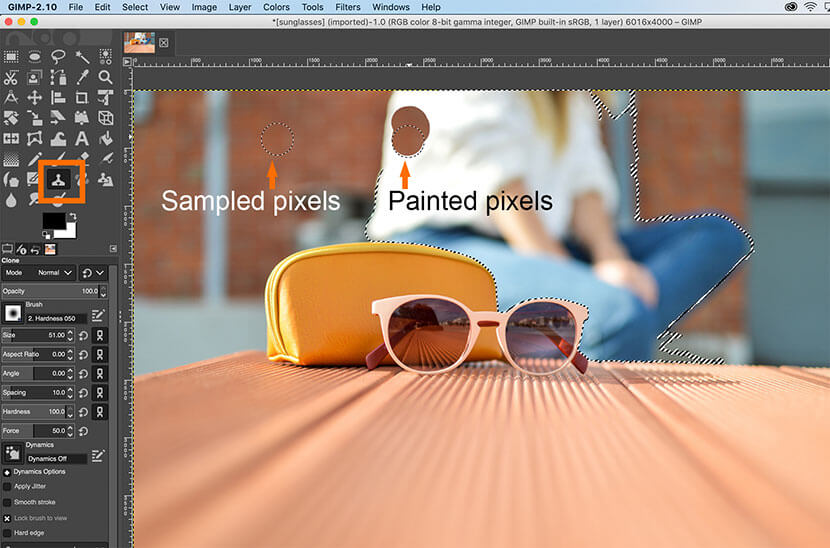
Continue painting with the Clone tool until the entire selection has been eliminated.
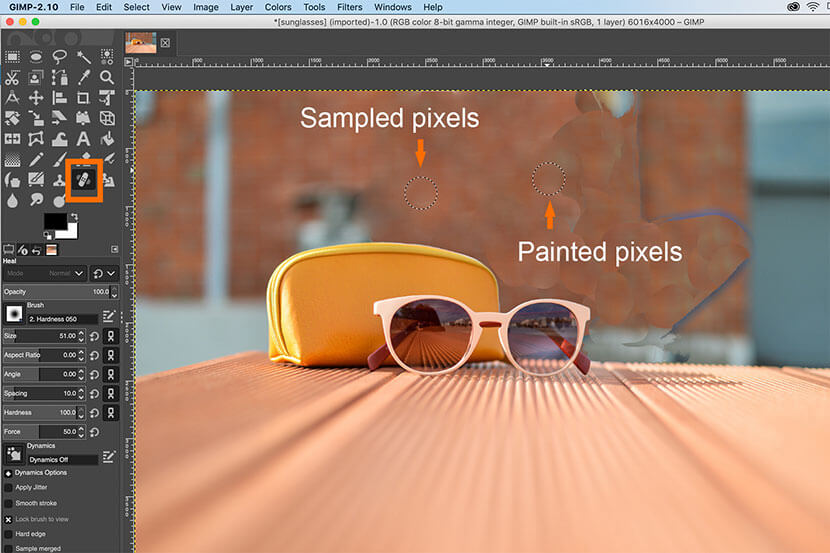
Step 5: Use the Heal tool to smooth out any unsightly edges. First, deselect your selection by choosing Select > None from the drop-down menu, or type SHIFT+CTRL+A (SHIFT+COMMAND+A on a Mac). Then, choose the Heal tool from the tools on the left-hand side of the screen.
You use the Heal tool the same way you use the clone tool. Select pixels you want to sample from by clicking and holding the CTRL key (COMMAND key on a Mac). Then, paint over areas you wish to "heal" using the tool.
Work slowly and carefully, and you'll soon have an image that looks as if that unwanted element never existed.


")


