Even the best product photos can use a little help before they are ready to be posted on an ecommerce website. Luckily, you can use Photoshop CC 2019 to apply easy and simple effects that make a big impact. The following tutorials will show you several simple manipulation techniques that you can start using right away, even if you are relatively new to Photoshop.
What is digital image manipulation?
Digital image manipulation is the process of using software such as Photoshop to edit or modify your photograph after it's been taken.
Receive free ecommerce & product photography tips
Digital image manipulation techniques can range from easy and quick to difficult and complex, depending on your photograph's needs. Adjusting your photo's lighting effects is a quick and simple way to enhance your image, call attention to a particular product within your image, create consistency across images, and convey a specific mood within your photograph.
In this tutorial, we'll go over some simple manipulation techniques using Photoshop lighting effects.
How to make a spotlight effect in Photoshop
We're going to begin this Photoshop lighting effects tutorial by mastering a simple yet powerful filter: the spotlight.
First, let's go over using the spotlight effect to call attention to a particular area of your photo. This is useful when you really need your product to stand out against the setting in which it was photographed. This effect can be as subtle or as overt as you want, but the more subtle the light, the more natural it'll look.

Step 1: Convert your image layer to a smart object
Whenever you work with lighting effects, it's a good practice to both duplicate your image layer and convert your new layer to a smart object. Not only does this ensure your lighting effects are non-destructive, but it also allows you to mask certain portions of the lighting once you've applied the effect. Keeping the original image Background layer also gives you the ability to blend your manipulated layer with your original image.
With your image opened in Photoshop, find your Layers panel, located at the lower right-hand side of the application window by default. Right-click (CTRL-click on a Mac) on the Background layer and select Duplicate Layer....

Name the new layer Spotlight.
With the new layer highlighted in your Layers panel, choose Layer > Smart Objects > Convert to Smart Object from the dropdown menu at the top of the application window.
Step 2: Apply the spotlight effect
With your Spotlight layer selected, choose Filter > Render > Lighting Effects… from the dropdown menu at the top of the application window.
Note: If you see Lighting Effects immediately below the Filter tab, as in the image below, do not choose it. Always follow the menu down and choose Lighting Effects… from the Render submenu.

In the Preview Window that appears, the Spotlight option is selected by default.
The Preview Window offers multiple ways for you to adjust your Spot. On the left-hand side, you'll see your image and a series of ellipses which control the intensity and direction of your light (make sure Preview is checked at the top of the Preview Window). The right-hand side offers sliders, some of which correspond directly to the ellipses on your image.

When you use the spotlight lighting effect, think of how an actual spotlight works. There's a light source (represented by the bullseye at the center of the ellipses), light intensity (which can be adjusted in the circle surrounding the bullseye, or with the Intensity slider on the right-hand side of the Preview Window), the thing the light is pointing at (the inner ellipse, or Hotspot), and the unfocused light that spills out around the light (the outer ellipse). You also have the ability to control the ambient light filtering through the entire image using the Ambience slider.
Click and drag on either the inner ellipse or the outer ellipse to adjust the size of these ellipses.
Click and drag on one of the points on the outer ellipse to change the light's direction.
In the image above, the light source is right beside the teacup, with the Hotspot landing on the teacup itself. The Intensity is set to 19, and the light's direction is coming from the left. The outer ellipse is very wide to make the spotlight look more natural.
Also, Gloss and Metallic are set to -100 to reduce the light reflections on the surface of the cup.
If you want to add additional spotlights to the same layer, click on the Spot icon next to the word Lights at the top of the Preview Window. A new Spot will appear, and you can toggle its visibility on and off in the Lights panel at the lower right-hand side of the window.

Once you're satisfied with the way your lighting effect looks, click OK.
Step 3: Adjust your layer mask
Because you applied this effect to a smart object, you can mask out certain areas of the spotlight effects.
For instance, in the image of the dishes below, we want to make sure the flames from the candles retain their brightness.
To mask out dark areas caused by the spotlight, click on the Smart Filters layer mask under the Spotlight layer.
Select the Eraser tool from the Toolbar, and make sure the foreground color is set to white and the background color is set to black. At the top of the application window, set the tool's Opacity to 50% or less and adjust the brush size and hardness as necessary.
Gently paint over areas of your image where you want to bring back the original lighting, as in the flames of the candles below.
Step 4: Add more layers, and spotlights, as desired.
Since you maintained your Background layer, you can repeat the process and add additional Spots in additional layers.
In the image below, we duplicated the original Background layer and applied a spotlight effect to the teacup and bowl to the right. Then, the second spotlight layer's Blend Mode was changed to Lighter Color. The final image highlights the dishes while darkening the surroundings.
How to change the color of a light in Photoshop
Now that you've mastered a simple spotlight light effect, let's use spotlights to change the light's color.
Manipulating color using the spotlight effect serves two major purposes for your product photos. First of all, it can drastically alter the emotional mood of the photo, which helps you influence the way your product "feels" in the eyes of the customer. Secondly, using the same color spotlight across all your product photos ensures the photos look like they belong together and creates consistency within your visual branding.
Example: Adding warm color lighting to your photo to create a vintage effect
Warm colors can create a feeling of comfort and familiarity in your imagery. They can also help you achieve a vintage effect
In the image below, a vintage effect was achieved by creating a yellow spotlight, and then adding a gradient map adjustment layer. Note that the entire light is changed, including the ambient lighting effect of the background.
Step 1: Create your spotlight
In order to achieve a similar effect, duplicate your Background layer and convert the new layer into a Smart Object as you did in the example above.
Go to Filter > Render > Lighting Effects… to open the lighting effects Preview Window. On the right-hand side, you'll see there are two places to change the color. The Color option affects the color of the spotlight itself. The Colorize option affects the overall color of the photo (in other words, manipulation of the light in your background). Double click on the color box next to each option to bring up the Color Picker dialog box.

In the above example, the Color option is set to a darker yellow and the Colorize option is set to a lighter yellow. You can also experiment with oranges and pinks to create other warm-color effects. Play around and see what works for you.
Step 2: Save your preset
When you're happy with the color and effect of your spotlight, you can save your settings to use the same presets on multiple photographs. This allows you to create a consistent look across all of your product photos.
In the upper left-hand corner of your Preview Window, you'll see an option next to Presets that says Custom. Click on Custom and choose Save from the dropdown menu.

You'll save the preset in Photoshop CC 2019 > Presets > Lighting Effects. It should have a .ple extension. Be sure you give it a name that you can easily identify later.
When you want to apply the preset you created to another photograph in the future, click on the same menu you used to save the preset to access your custom preset. Photoshop's default presets, such as "2 O'clock Spotlight," are located at the top of the dropdown. Any presets you create you can find at the bottom of the dropdown menu. For instance, in the image above, you can see the custom-created presets called "harsh_cold_light" and "vintage_effect."
Once you've saved your preset, click OK.
Step 3: Apply a Gradient Map adjustment layer
Changing the light color may be the only effect you need to add to your image. If you want to add even more depth to your colors, however, you can add a gradient map adjustment layer on top of your Spotlight layer.
With your Spotlight layer selected in the Layers panel, click on the Adjustment Layer icon at the bottom of your Layers panel and choose Gradient Map....

When you create your gradient map adjustment layer, your image will immediately change color depending on whatever colors you have as your foreground and background. Don't worry, we're going to fix those colors next.
In your Properties panel, click on the gradient itself. In the image below, it appears as a long white bar because both the foreground and background colors were white when the layer was created; yours will probably look different.
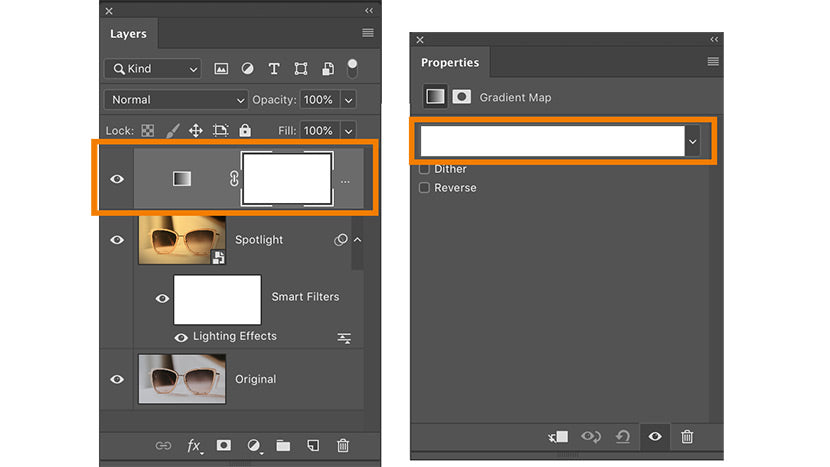
Once you click on the gradient, the Gradient Editor dialog box will appear. Select the gradient slider to the left and click on the color swatch next to the word Color. The Color Picker dialog box will appear. Adjust the color to magenta and click OK.

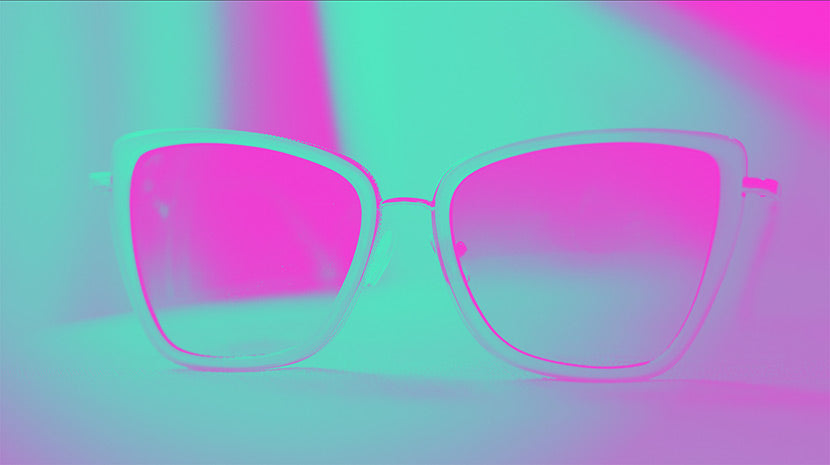
Next, in the Gradient Editor window select the gradient slider on the right, and adjust the color to teal. Click OK in the Color Picker dialog box, and then click OK in the Gradient Editor.
Your image will now look something like this:
Step 4: Blend the gradient map
Change the layer blend mode of your adjustment layer to Soft Light.

Now, you will have an image where you have not only added a color light, but also additional layers of color on top.

Example: adding cool color lights to your image
If warm color lighting creates comfortable, relaxed imagery, then cool color lighting can create an image that feels exciting or edgy.
Using the same technique above, but changing the Spot Color and Colorize to blues, we can completely change the mood of the sunglasses image.

We can enhance the mood further by applying a blue to purple gradient map.
How to create a lens flare in Photoshop
Another simple manipulation you can apply to your image is a lens flare. Use lens flares judiciously, as too much lens flare can make your image look washed out or unnatural. However, lens flares can be a great way to add additional sparkle to shiny products such as jewelry or light fixtures..
Step 1: Apply lens flares
In order to achieve the effect shown in the above photo, you'll need to apply several lens flares, and then use Layer Blend Modes to blend the manipulated layer with the original image.
To begin, duplicate the Background layer and convert the duplicated layer to a Smart Object, just as you would for a spotlight effect. Name the duplicated layer Lens Flare.

Choose Filter > Render > Lens Flare from the dropdown menu at the top of the application window.

In the dialog box that appears, use your cursor to set the brightest point of the lens flare on the shiniest, brightest point of your image. You can try different lens types here to see what works best with your image, and move the slider to adjust the size of the flare. This image has 50–300mm Zoom applied.

Don't be worried about washed out areas caused by the flare—we'll be removing those in a minute.
Click OK.
In the same layer, apply the Lens Flare again, this time choosing Movie Prime. Click OK.
Step 2: Mask out washed out areas
In order to temper the lens flare a bit, you can now mask out portions of the Smart Filters layer mask, just as we did in the first spotlight example above.
Select the Smart Filters layer mask and, using your Eraser tool, mask out portions of the image where you want to bring out darker colors. In this image, the flare is masked out on the green and red jewels.

Step 3: Apply original Layer
If you haven't done so already, double click on the Background layer to make it editable. Then, drag that layer above your Lens Flare layer.
Change your Layer Blend Mode of your original layer to Hard Light to intensify the contrast.

You can adjust the opacity of the Hard Light layer to reduce the intensity of the colors.
If you want to add another layer of depth to the final image, duplicate the Background layer one more time, place it on top of the other layers, and set its Blend Mode to Overlay. Adjust the opacity of the layer until you achieve the desired effect.

How to fix lighting in Photoshop
The lighting effects in Photoshop we've discussed so far have focused on adding additional lights to your existing image. But what if your original image has shadows that are too deep or highlights that are too bright?
Thankfully, there is a simple manipulation technique that you can apply to your photo to fix your image's lighting.
Step 1: Adjust Shadows and Highlights
As before, duplicate your background layer and convert the layer to a Smart Object.
From the dropdown menu at the top of the application window, choose Image > Adjustments > Shadows/Highlights.

In the dialog box that appears, make sure Show More Options is checked to give you full adjustment control.
Drag the Amount slider under Shadows to the right to reduce the intensity of shadows.
Drag the Amount slider under Highlights to the right to reduce the intensity of highlights.
Go ahead and adjust the Tone and Radius sliders under each to get a feel for how each of these affects the image. You can also adjust the Color slider under Adjustments to increase or decrease saturation of your image.

Once you are satisfied with your adjusted image, click OK.
Step 2: Add a new lighting effect if desired
In the globe image, shadows and highlights are reduced to the point that the image almost looks flat. We can add dimension back into the image by using our trusty spotlight effect.
When you apply a spotlight to an image you have corrected in this way, make sure that the new light source isn't too harsh; you don't want to undermine the corrections you just applied. In the case of the globe, we can apply a low-intensity white Spot that shines just on the area surrounding the Mediterranean. That way, our shadows will fall on the right and left sides of the globe.
 Sharpen your Photoshop skills
Looking for more great ways to bring your photos to life with Photoshop? Browse our library of tutorials to learn how to change backgrounds, create realistic drop shadows and more.




 Sharpen your Photoshop skills


